CLICK HERE FOR FREE BLOGGER TEMPLATES, LINK BUTTONS AND MORE! »

Sunday, February 27, 2011

A Birthday Card, or Two!

Hello everyone,

Here is the Birthday card I made for my Sister in Law, it took a little longer to get around to doing than I thought it would, and then I made another one in the same design and now I can't decide which one to give her! aaagghhhh

Here they are..

Wednesday, February 23, 2011

Mojo Monday #179 is a Happy Birthday

Hello Blogland,

(he he he, I always wanted to say tha!)


I have made my Mojo Monday sketch this week fit in with my Niece's 3rd Birthday.
I am sure Erin will like it, she's a big fan of pink at the moment - the colour that is, not the rock star! lol

My new stamps from Spesch Designer Stamps arrived and this is one of them, just perfect for a little girls' birthday card.This one is called Sophie and is a clear stamp. Spesch sell digi stamps too, however I've not the right printer for them - yet!  I'll probably have to share this with the Spesch group of girls on facebook too, just to show it off.

The candles are Kaiser rub-ons and the 3 is a chipboard number that I have coated in glitter. The stamp "Birthday Girl" is from a cheapie pack I found in K-Mart and I used my Stampin Up marker in Melon Mambo to ink it up.  The papers are all from a paper stack that I picked up in Big W. There are 2 circles around Sophie and both were cut out with a Fiskars cutter. The top one was then trimmed with a wavy scissor to show the one beneath.  The border beneath was just layers of papers cut with a couple of border punches.


This is the Mojo Monday sketch and I have used a little poetic license with my card and not everything is where it should be, but it's prety close I think.


I'll be posting another card sometime in the next couple of days for my Sister In Law's birthday, who is 2 days apart from her daughter. I lost the bet by 2 days when Erin was born, I could've sworn she would arrive on the same birthday! Keep an eye out for it anyway, it's going to have an unusual opening.

Hope to see you here again soon.


Tuesday, February 22, 2011

A Note of Thanks

I wanted to post this card I made a little while ago using a gorgeous flower stamp that I have. I do use this stamp quite a lot for this style of card. A Note of Thanks is from a Stampin Up set and it suits this perfectly.


I thought I'd enter this card in Challenge #34 over at Lexi's Creations, which calls for Flowers. These are certainly flowers!

It's a nice simple card to make and very effective.

Sunday, February 20, 2011

Quick Bliss

I simply had to have a go at my new Bliss stamp set from Stampin Up.

It is just so adorable, this is only the beginning of a fine association with this set I am sure. I haven't even got to the little birdie yet!

I ran this card up quickly tonight, just for fun - as you do!


The stripey paper is from Kaiser's "Tea at Elsies" collection and the dotted paper is Stampin Up "Blueberry Crisp".

A spellbinder labels die stamped on the background with "Crumb Cake" and the gorgeous chandelier type stamp and overlaid with Bliss in "Soft Suede", the edges of the label are sponged with "Marina Mist".

The butterflies are stamped with "Marina Mist" and one of the butterflies is lighter because I stamped it twice without re-inking.

I distressed all the edges of the paper, peeling some back here and there to reveal the under-side. Sponged all the paper edges with "Crumb Cake" and when it was all assembled I sprayed a squirt of broken china distress ink mixed with perfect pearls and water. It is a little shimmery although you can't see it in the photos.

I must say, it is Bliss when you don't have to be tidy with things. he he.

Home Sweet Home

Hello blogland friends,

I have had a lovely Sunday afternoon working on some cute cards with a Home Sweet Home sentiment.

Here they are...


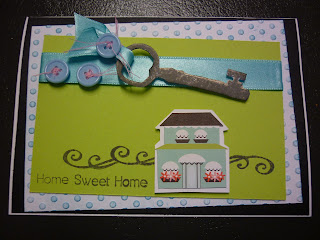
This first Card has an embossed background sheet of white card that I sponged a blue ink over so that just the dots were coloured. I kinda mounted it all crooked on purpose if you're wondering, I liked the out of whack look here. The house is cut out of paper from Three Bugs in a Rug and is part of the A Trip to Paris release. This paper was perfect for fussy cutting out the the little houses. I stamped the key and cut it out, I'm not sure where the stamp came from, it is a silicone stamp and there are two of them floating around my stash, as you will see. the Home Sweet Home sentiment is from Kaiser. I;'ve sewn the buttons on with pink cotton, and matted the whole thing on black to make it stand out.


The second card was a bit of mistake to start with, but somehow I saved it...I think?
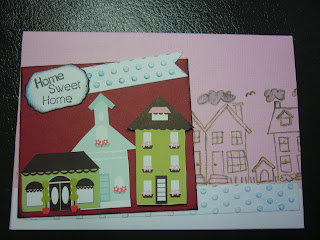
First of all, my pink card had the bottom of one side lopped off it, so I attached some white card to the bottom to make it whole. I then started with my Stampin Up roller stamp "Neighbourhood" and it didn't imprint properly across the whole card, so I came up with the idea of having half skeleton picture and half solid colour picture. The strips of embossed dots are leftovers from the first card and the paper houses are from the same paper as before. I used one of my spellbinder labels dies for the sentiment. I think it turned out okay despite the initial challenges.


Last but not least - and this is my favourite, I have used my dotty embossing folder and again swiped blue ink ("marina mist" I beleive), all over the raised dots. I have fussy cut the little houses out of "A Trip to Paris" paper layered them on a green card. I cut the corners of the card with the very top of a small heart punch for a different corner effect. My spellbinder labels die came into use here again - the next size up from the last one, and the second key stamp that is floating around my stash was stamped in both "Basic Gray" and "Sahara Sand" Stampin up inks, cut out and a little ribbon tied on. Again I have matted the whole thing a little crookedly and on a black mat to make it stand out.

Friday, February 18, 2011

New Baby Cards

Hello everyone, I had an inspiring night last night in Girl World and managed to finish off a set of baby cards that I thought my florist girlfriend may like to sell.

I actually managed to make 8 cards all up, with varying backgrounds, here's a look at just a couple of them.


I found the sticker of the baby sucking it's thumb in 
a newsagent stand and only bought 1 sheet of it. 
I knew I'd be able to do something with it.


The silver borders are foil stickers and I really enjoyed putting them on. They can take quite a bit of concentration.

The sentiment "new baby" is on of Stampin Up's but I don't have the name of the set in front of me. Something like "teeny tiny sentiments" I think, but don't quote me on that!

The alphabet background paper is from Kaiser, and as usual the ribbon is from my stash. :)


I did some with just plain card too, also a pink one - just don't have a photo of it.
I hope you like my creations, they are quite simple but I think effective.

Wednesday, February 16, 2011

Mojo is the Nicest Thing

Hello Everybody,

I've got my Mojo happening a little earlier this week.

The Mojo Monday Sketch 178 this week is


I liked this sketch, but ended up turning it upright so I could use my new stamp.


It's "The Nicest Things" set from Stampin Up and I Love It!!! I've cut the image down a little with my (also new to me) rectangle spellbinder, and matted it onto an embossed rectangle. The embossing is Stampin Up again with their Textured Impressions folder. The colouring was done with a combination of Copics - for skin (yes the only two copics I own), some Stampin Write markers combined with the blender pen from Stampin Up and a couple of normal Texta pens.
The patterned paper is from a big block of papers that I bought at Big W and the ribbons are from my stash.

I tried to use the colours from the Lollipop Ladies blog challenge #14 which was this yummy, colourful pile of smarties in a heart (I think I got the colours right, just couldn't manage the heart.)


That's it from me today, have had a busy week and still more happening through until next week so not much time to get out into Girl World, but I'm determined to make my Mojo happen each week!

Friday, February 11, 2011

Mojo Monday 177 - Sweetheart Be Mine!

Hello again,

My Mojo for this week is a little late due to the Dentist wanting to pull out the remains of my tooth, which had snapped off last week whilst eating a nut bar!The snapping didn't hurt, the old tooth was dead from a root canal 20 years ago, but the pulling sure did.

This took me ages of mucking around to get it right, and I'm still not entirely happy with it.  As you would know I'm not one for making everything perfect, the sentiment is a bit too messy me thinks, but here it is anyway.


Here is a bit of a close up of the little birdie - it's from stampin up and while I don't have that punch, my friend Trish does. I dabbed green perfect pearls all over his wing and across the top. It's really shiny, but as usual doesn't show in the photos.


The background was a pretty metallic paper I picked up at my newsagency and embossed with the new Stampin Up embossing folder. I love this folder!!! Again the shine is not showing darn it!

The lace is a strip of seam from an old lace jacket that was past it's prime and much more suited to my cards lol. get it jacket - suited, small pun there.

Hope you all like my Mojo this week.

Wednesday, February 9, 2011

Love love Love Love Loooove

Hello,

Seeing as how Valentine's Day is getting closer and a couple of Valentines' challenges are running too, I thought I better pull my finger out and do something.

This card was made with left-over bits from my Vintage Card Class with J.A.M, I am going to use every last scrap of that sheet of paper it was so very pretty.


The L on this card is a chipboard letter that has been embossed with black glitter embossing powder, it really shines, I was very pleased with how it turned out. The rose stem has been threaded with Beads and the whole thing glued ontop of the L. The rest of the Love word and the sentiment is a simple rub-on.

I have also used some little clear beads and bits of lace here and there. The whole left side of the paper is trimmed with a little pom pom style lace which I had been dying to use and not found the right place for until now. Here's a close up for you....


I especially love how the paper is folded back revealing the underside which has a bold black herringbone pattern on it, and the rose is kinda tucked in there peeking out surrounded by clear beads and more lace here too, they all offset that gorgeous paper.


In the bottom corner I have added more lace and beads with the rose, along with these stemmy blobs that will be perfect for the inner stamens of flowers. I don't know what they are called, but I found a packet and have a couple of hundred of them now. They are just gorgeous.


Well I'll enter this over at Sandies Place for her February Challenge which is themed with Fabric & Love. I got the Love right, the fabric is a bit lacey though lol.

There is also  Challenge # 14 at Stamps R Us with Valentine/Love theme that I think this card fits perfectly. Even though I've not used a single stamp here!

Above all else, I hope you enjoy looking at it :)

Monday, February 7, 2011

My own Shoebox Swap

Well I must say thank you to Trish for sending me a picture of my card. She took my shoebox home to finish off her own copy of my card.

This is the card I put in the shoebox swap


My card is made with the same DP that I used on the Mojo 176 card. I did say I bought a lot of it!

In the box I placed textured white card stock for the card base (cut to size),  "Tempting Torqoise" ink pad and Jumbo Roller with the "Friendly Words" roller attached -from Stampin Up 3 x embossed roses to be coloured in by the participant. a strip of ribbon, the beautiful blue DP, 3 x rhinestones, a push pin with shiny blue top and a pretty blue bead.

The tools included were an X-Cut punch, Water brush, sponge,The Jumbo Roller, and some glue and dimensional tape.

The instructions went something like this:
Roll the Jumbo Roller Friendly Words stamp across the top of the card, making sure to have the words facing the right direction for a tent fold card.
Colour in the three embossed roses with the water brush or sponge and cut them out. Making sure to have 1 x full sized Rose, 1 rose with the outer petals cut off and the third rose with all the outer petals cut off. Hilight with more ink the outer edges of each rose.
Layer these roses biggest on the bottom to smallest on the top with dimensional tape between them.
Punch the border along the bottom of the DP and stick it beneath the rolled image on your card.
Tie the ribbon around the whole card, covering the gap and tie a bow.
Stick the dimensional rose to the front of the card, over the ribbon - this will hold the ribbon in place.
Push the pin through the knot of the bow on the ribbon and glue the bead to bottom of the pin so no pointy end is showing.
stick the 3 rhinestones in place on the bottom of the card.


For those of you who don't know how it works, the Shoebox Swap involves a bunch of girls making a card and then putting into a Shoebox both the materials and the tools to make that card along with instructions on how it is done.

Then everyone puts their box on a table in the middle of the room and the boxes are numbered.
We all then go ahead and make eight cards starting with the number after our own box. So for instance, my box is number 1, I then go and make box numbers 2,3,4,5,6,7,8 and 9.
This system works well, depending on how many boxes you have of course.

There you have it!

The beauty of this idea is that everyone does something a little different with your design. Check out how Trish did hers.

Sunday, February 6, 2011

Mojo 176 - Beautiful Blue Flowers

Hooray, it's Sunday and tomorrow a new sketch will come out, but I got it done and that's all that matters. Consistency saved!

I never thought I'd even be interested in cards today, after a full day yesterday at my Papermates meeting and making 8 whole cards!! Awesome day, check out what I made here.

I still have some Mojo today, so that is great.Here is my Mojo Monday #176 for this week, hope you all like it...


I used the same paper reversed at the top of the card, and made flowers from the paper as well. 
There are three types of flowers here - some rolled roses similar to my Heart card. The second are made from a small heart punch folded in half to create a petal and laid around a circle of card, glued in place and a pearl or rhinestone added to the centre. Finally the third flower was using the heart punch too, but I folded paper and cut across the fold with the punch using just the humps of heart. The resulting piece is kind of a figure eight petal shape and this is sponged and laid across each other with a seed beed in the centre. (These were on Velita's Designs in a bigger version, but my heart punch is tiny, so this is what I get.)

I decided to use two different colours of ribbon for variety and to tie in the little beads I have glued here and there.

Check out the dimension on this card - something I have learned that I love is dimension!


I don't know the name of this paper, but I bought about eight sheets of it I liked it so much. It's the same paper I used on my shoebox swap - which hopefully Trish will post sooner or later. Keep an eye out for it over on her blog http://trishandtreasure.blogspot.com.

Have a great week, I've got a busy one coming up, so unless I do some late night stamping, I'll probably be back next week end with a last dash effort at the next Mojo!


Saturday, February 5, 2011

Papermates - February

Hi Everyone,

I was going to leave this post until tomorrow - but the kids across the road are having a party and I can't sleep - so here I am telling you about my wonderful day and the gorgeous 8 cards I made today yahooo!

I have been going to my local Papermates club one Saturday each month for a few months now and enjoy the company and gossip and cards immensely. They're a great bunch of girls :)

This month we had to take a shoebox with 8 Kits of one card and instructions on how to do it, then everybody made 8 cards - i won't go into the detail of how boxes were chosen it's too tedious to mention really.

Anyway - here are the cards I made, which were designed by 8 other girls and made by me.
I love them all!


I adore the torn strips of paper here - gorgeous paper!
This flower was a mission, but worth it, look at the detail


And the butterflies below were so easy it wasn't funny (die cuts will do that I suppose).

Another easy one above, but very effective and useful for anything with no senitment.


A mans' card that is to die for!! I love those nuts and bolts.

A very different design that was quite awesome I thought. The whole card is stuck flat and the heart opens up to reveal a little tag tucked into the base card that has the sentiment on it. Check it out!

This sweet flower was lovely and the butterfly is dimensional, sweet.
Water Colour pencils made this flower really pretty, and the back-ground paper has the swiss dots that I like.

Over all I had a wonderful day, and while I'm a little tired I am still pumped about the cards I made.

My own card will probably be found over at Trish and Treasure at some stage - Silly me forgot to take a photo of it myself, but Trish got to make it today so I'll let her show it off! Check out her blog anyway at http://trishandtreasure.blogspot.com she has some pretty good stuff on there!

Have a great week, it seems the party across the road is packing up finally, so I'm off to bed.

Thursday, February 3, 2011

I think I'm Finally Happy

With my blog that is...I found an all in one template that was easy to use, and I quite like it.

I'll be sticking with this look for a while - since it took me 3 hours to find it and upload it!!!!

Hope you will all recognise my blog, if not, too bad, it's staying this way! lol

A Birthday Card

Hello All,

Before we get to my birthday card, I just thought I'd ask what you think of the new background. I'm slowly getting my head around this blog stuff.

Here's a card I made for a friends birthday, just thought I'd share it with you.


I really enjoyed making the leafy background with all the different coloured leaves. I made sure to use the stamp a couple of times each time so that the images faded out. I also like the colours. The sentiment is from a Stampin Up set - one of the 'labels' ones. The bird and tree on the front are from a set I picked up at Sams Warehouse. You could say they are home brand I suppose, but I fell in love with it.

Have a great week everyone, I'll be back to post my Mojo 176 possibly tomorrow, however I have a papermates meeting on saturday and need to prepare a shoebox swap for 8! Might be pushed for time, so I'll blog that instead if that is the case and shock horror, miss my mojo this week!

Oh I forgot to mention that I used a spellbinders label die to cut just the top off the backing sheet. How did I do that you ask? Well it was simply a matter of lining it all up off the edge of the cutting pad and running it through. This way there was no pressure on half the die. easy peasy I say!

Tuesday, February 1, 2011

Brayer Practice - First Try

Hello, how are you all today?

Here is my practice run on using a Brayer, as discussed in the previous post.

My friend has the brayer, but we found it was a bit small and didn't quite work the way we wanted it to, at least that's my excuse and I'm sticking to it.

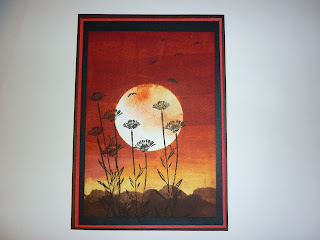
 As you  can see we made two cards, the first was a sunset version.

And a Moonlight version.


We followed some Youtube tutorials on brayering, I'm sorry I don't have the links to them, but if you search "brayer tutorial" you'll no doubt find the originals of these two cards - albeit in much better condition :)

I am having a Stampin Up party in March and have got a big brayer on my list of items to buy, so when I have it, I'll have another go at these two and we'll see the difference. Maybe it might just be me and not the brayer! lol.