CLICK HERE FOR FREE BLOGGER TEMPLATES, LINK BUTTONS AND MORE! »
Showing posts with label Theme Butterfly. Show all posts

Wednesday, June 8, 2011

More Papermates

Hi Everybody,

I finally finished off the remaining cards from the kits I received at Paper mates. (see previous post for the first lot).
I’m going to post these ones into a couple of challenges each, so I’ll link challenges up under each card.

First is my own kit – I really love what Trish did with these materials and found it hard to come up with something remotely as good Smile (love you anyways Trish!)
Here are the two cards I made with my own kit…
P1020205
This first one is a favourite of mine, simply for the sentiment – if only we could get away with doing all the Nothing we want!
The second one below, I took advantage of a pattern that was on the reverse side of the butterfly paper and used it as a central piece and layered the gorgeous little butterfly over it. The paper around this decal was a lovely script writing (as seen on Trish’s card).
P1020196
Here’s a close up of that butterfly – it was a cheap shop find and very pretty.
P1020197 
a few gold brads down the centre to go with the little badge sentiment of beauty.
I’ll post this into these challenges:

The next  card was the remaining bits from Cheryls kit…
P1020203

I coloured this in with twinkling H20’s and did a pile of distressing and even used the bag the bits came in. I had to add my own sentiment here, but that’s not a bad thing.
These are the challenges I’ll enter this into:

Last but not least is from Anne’s kit (and I still have one more to make with this kit!)
P1020200

There’s that feather I was telling you about in the first post. Looks fab with the little silver fan and that swirly paper. A silver foil Happy Birthday sticker and  a little ribbon and there you have it!
These challenges suit this card

Well that’s it for me for the moment. My Mojo card for this week will be along in a day or two – it’s almost done!
As always – hope you like the cards Smile

Saturday, May 21, 2011

Happy Birthday Kristy

My good friend Kristy is having a birthday – 31 on monday – and she thinks she’s old! lol I made this card for her and thought I’d share it with you first.

P1020130
It’s got a lovely tri-fold factor….
P1020132

...and because she loves flowers, butterflies and purple I used Kaiser “purple” paper that is covered in big bold flowers and embossed some gorgeous little butterflies on two of the panels using one of the butterflies from my new Annabelles Stamp “All Things Grow”. (which is the set I chose from my win with Annabelles a few weeks ago)

I’ve also used my SU Embosslit “Beautiful Wings” to cut some butterflies out and decided to emboss them silver along with the sentiment on the front panel. Some pretty bling finished it off.
Hope you like it. I’m gonna enter it in a couple of challenges I like it so much.


I did say a couple of challenges! lol

I'll be back later with a couple of brayered cards I did using the stamp set from Annabelles mentioned above :)

Sunday, April 24, 2011

A tempting morsel of glitter

Hi Everyone,

(All 14 of you followers lol)

I thought I'd give you a tempting little morsel of glitter, because I promised you glitter and even though I haven't put these things to use on a pretty card yet - I have made them from scratch and need to share (aka show off).

Once again my good friend Trish has given me some insight.

We worked together and I wanted to make some acetate butterflies with some gorgeous napkins I came across. So away I went and used my PVA Glue with the acetate and some glitter and laid the napkins down and let them all dry, then backed it with plain white card. They worked fine, here's one I've cut out ready to put on a card. It's actually quite big - about 8cm square. There are smaller ones too in pink and yellow, but you'll just have to keep an eye on my cards to spot them as I haven't got any pictures of them yet.


Trish wanted to share a tag project she had which funnily enough was a similar process - only she was using glossy accents with the glitter and some ink (no napkin), Just a bit of tissue paper backing.


There is a cardboard backing on these tags (cut with a sizzix die in the Big Shot machine) that allows you to write on the back of them.

 The pink glitter really stands out!
We got such glued up, glittery inky fingers doing this, as you kinda mush the ink and glitter into the glue. Great fun!

What do you think - here are the tags I've made. I have stamped on the front with Staz On - that slippery thing got me again, but hey it's all good... I think I'll enter them into an Anything Goes challenge like...

inspire me Fridays – anything goes -

or 

lady bugs crafts Ink TLT - anything goes

I think the Glossy Accents makes all the difference in that it kinda suspends the glitter in it and has this depth that lets the glitter shine.
My conclusion is that PVA Glue works too, but Glossy Accents does it better.

 Well there's my tempting morsel of glitter, hope you like it. I'm sure you'll see the butterfly embellishments on my cards in the not too distant future :)

Wednesday, April 6, 2011

Mojo Every Moment

Hello Everyone,

I received my Stampin Up order in last week and found the Mojo Monday Sketch this week was the perfect opportunity to use my new stamp - "Every Moment", and the "Beautiful Wings" embosslit.

Without further adieu - here tis...


I really enjoyed colouring this image in, I used a Stampin Up blender pen with either a marker or spot of ink on the craft mat. (Colours were Wild Wasabi, Soft Suede and River Rock together and a tiny bit of pumpkin pie on beak and legs.)

I shaded some pale orange chalk over the image to soften it a little. The image was then die cut with spellbinder circle and matted onto a spellbinder scallop circle die cut.

The big scallop is a 1" circle punch laid underneath and the ribbon is from my stash. The green pearls are from Kaiser.

This is the Mojo Monday #185 Sketch, and this week it's a competition week. I'd really love to win a Verve stamp set - wish me luck!


I'll be back later with some cards I made through the week, just for fun, as you do. Feel free to come back a take a peek. :)

Saturday, March 5, 2011

Papermates - March 2011

Hello Everyone,

I have been slack and still haven't finished my third Spesch Stamps card - even after a full day at papercrafting, I guess there was just too much else going on at papermates today. Which is why I am here tonight - blogging! (and I had to beat my friend Trish to the post for a change - man that girl is organised!)

Today we had Amanda Cordingley - a Kaszazz rep (did I spell that right?) - do a make and take for us. Always a bit of fun. We made a beautiful paper flower - which I stuck to the front of the card I made today, and we also made a lovely card.

Here is the card Amanda organised for us:-


It really is quite pretty. The background was embossed and sponged over with distress inks. The tag was was also sponged over with distress inks after stamping the sentiment. The butterfly was stamped, cut out and coloured in with a water brush and some more distress inks. I love it.

The card I made was a bit of an experiment and there are quite a few things I would change when doing the next one - the size for instance! lol. This one turned out a bit large :) It is a slider card and I love the concept, but will be playing with a template for this type of card I think before making it again.


Note Amanda's flower stuck to the front.Oh, and the pull / hold tabs are my spellbinder Labels die. As usual I can't remember which number labels they are!


This flower is so very easy to make. Simply torn paper, curled with a wooden skewer and stuck together with a little punched flower and bling. Very effective.

Anyway, that's it for today. Hope you like the products of my day.

Tuesday, March 1, 2011

Get Well Soon Set of Four!

Hello again,

I told you I'd had a wonderful un-interupted day of crafting! lol.

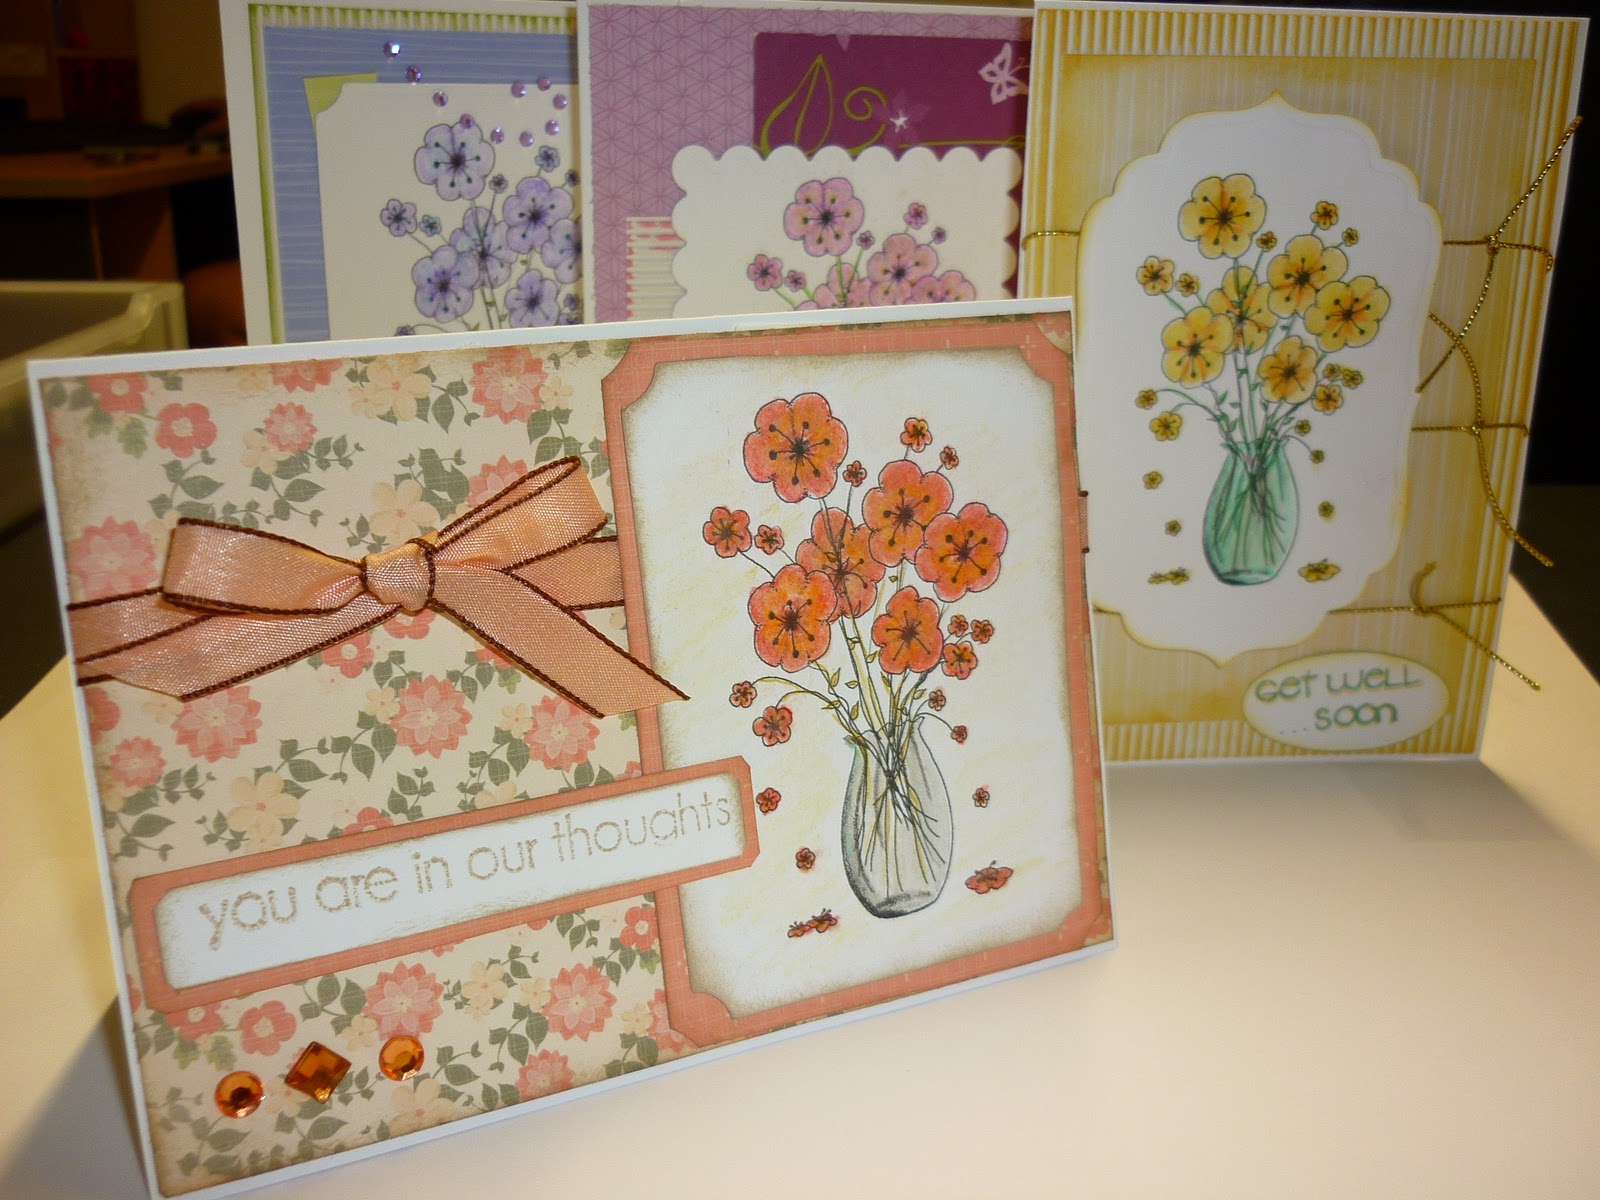
My Third Spesch Designer Stamp is going to have to wait, it's been beaten to the post by a set of four, yes that's right - FOUR - pretty get well soon cards. I think they would cheer me up if I were not feeling well.


I had printed this image (It was an internet freebie) four times on one sheet of white card and sat down to colour them in. I did four different colours to see what effect it would have and I loved all of them. A couple of them even have shimmery perfect pearls added to them. 
I have used water colour pencils to colour them and blended the colours with a Stampin Up blender pen. I'm not sure if you're supposed to use the blender pen with pencils, but I find it is an easier to control medium than using a water brush.

Here are some individual photos to show each one off.


I've possibly gone a little overboard with the rhinestone flourishes on this one, but I was having fun.

The paper is  DCWV scrapbooking stack and I've used corrugated board swiped with ink underneath.


 The butterfly on the paper inspired me to make a butterfly and It kinda evens up the layout a little.

The paper here is from Stampin Up and is one of my favourites.


 Perfect pearls on the flowers make them shine.


All the flowers are coloured with water colour pencils and the Stampin Up blender pen. I used a Versa Marker pen to ad spots that the perfect pearls would stick to and then spritzed it with a mini mister of water to set the powder.


I love the gold twine on this one.

It's also DCWV paper - the yellow in the same pack.

The sentiments I've used are from Kaiser - The Get Well Soon mini clear stamp set.

I actually stamped it in a lighter colour and then went over it with a marker to get the colours I wanted.


 This peach coloured card is my favourite.
The paper is from Kaiser and that's the last of the set that I bought. boo hoo. 
The ribbon from my stash matched perfectly, as did the little gemstones. That doesn't happen too often! 

I have also distressed some of the edges with ink on almost all of the cards, sometimes on the corrugations and other times around the frames - mostly Stampin Up colours.


Sunday, February 20, 2011

Quick Bliss

I simply had to have a go at my new Bliss stamp set from Stampin Up.

It is just so adorable, this is only the beginning of a fine association with this set I am sure. I haven't even got to the little birdie yet!

I ran this card up quickly tonight, just for fun - as you do!


The stripey paper is from Kaiser's "Tea at Elsies" collection and the dotted paper is Stampin Up "Blueberry Crisp".

A spellbinder labels die stamped on the background with "Crumb Cake" and the gorgeous chandelier type stamp and overlaid with Bliss in "Soft Suede", the edges of the label are sponged with "Marina Mist".

The butterflies are stamped with "Marina Mist" and one of the butterflies is lighter because I stamped it twice without re-inking.

I distressed all the edges of the paper, peeling some back here and there to reveal the under-side. Sponged all the paper edges with "Crumb Cake" and when it was all assembled I sprayed a squirt of broken china distress ink mixed with perfect pearls and water. It is a little shimmery although you can't see it in the photos.

I must say, it is Bliss when you don't have to be tidy with things. he he.

Saturday, February 5, 2011

Papermates - February

Hi Everyone,

I was going to leave this post until tomorrow - but the kids across the road are having a party and I can't sleep - so here I am telling you about my wonderful day and the gorgeous 8 cards I made today yahooo!

I have been going to my local Papermates club one Saturday each month for a few months now and enjoy the company and gossip and cards immensely. They're a great bunch of girls :)

This month we had to take a shoebox with 8 Kits of one card and instructions on how to do it, then everybody made 8 cards - i won't go into the detail of how boxes were chosen it's too tedious to mention really.

Anyway - here are the cards I made, which were designed by 8 other girls and made by me.
I love them all!


I adore the torn strips of paper here - gorgeous paper!
This flower was a mission, but worth it, look at the detail


And the butterflies below were so easy it wasn't funny (die cuts will do that I suppose).

Another easy one above, but very effective and useful for anything with no senitment.


A mans' card that is to die for!! I love those nuts and bolts.

A very different design that was quite awesome I thought. The whole card is stuck flat and the heart opens up to reveal a little tag tucked into the base card that has the sentiment on it. Check it out!

This sweet flower was lovely and the butterfly is dimensional, sweet.
Water Colour pencils made this flower really pretty, and the back-ground paper has the swiss dots that I like.

Over all I had a wonderful day, and while I'm a little tired I am still pumped about the cards I made.

My own card will probably be found over at Trish and Treasure at some stage - Silly me forgot to take a photo of it myself, but Trish got to make it today so I'll let her show it off! Check out her blog anyway at http://trishandtreasure.blogspot.com she has some pretty good stuff on there!

Have a great week, it seems the party across the road is packing up finally, so I'm off to bed.