CLICK HERE FOR FREE BLOGGER TEMPLATES, LINK BUTTONS AND MORE! »
Showing posts with label Roses. Show all posts

Wednesday, July 18, 2012

Mojo Fifth Avenue Rose

Hi Everyone,

I’m back and have managed to do my Mojo Monday sketch for the week and what a sketch it was, so many elements to it – here is my card, a beautiful black rose!

P1030663

The beautiful rose from Fifth Avenue Floral was heat embossed with White Stampin’ Emboss powder onto Black cardstock and fussy cut out.
I then highlighted areas of the Rose that I wanted to coat in glitter using the Versamarker and Heat n Stick Powder. The Versamarker lets you put glitter just where you want it and is great for doing fine lines. The Stampin’ Glitter is Dazzling Diamonds – it is truly very fine in texture and it sticks well using the powder.  

I used the same Pear Pizzazz coloured paper from the Twitterpated Designer Paper pack that is in the current mini catalogue to make the leaves and the underlying mat – just offsetting the pattern.
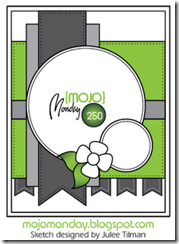
Not only did I use the  Mojo Monday sketch, but also the Colour Q challenge colours…

Mojo250Sketch       cqc146

What a blast of fun I’ve had making this card – lots of Sizzlits (Floral Fusion, Little Leaves, Lots of Tags) cut out with my Big Shot and various papers/ cardstocks. Also one of my all time favourite stamp sets – Fifth Avenue Floral – which is possibly going to be retired in September when the new catalogue arrives. boo hoo.

P1030661

The sentiment really appeals to me as I am far from a perfectionist and I could really use this as a motto to slow down and do it right the first time! 

Hope you all are having a lovely day, perhaps sitting by the ‘puter having a cuppa? Whatever your doing, enjoy and I’ll catch you later.
Signature Watermark

Sunday, May 22, 2011

Rosey Mojo

Hello Everyone,
I’ve gone all rosey for Mojo Monday #191 and figure it’s the perfect card for my Nanna’s freinds’ 95th Birthday. It says nothing about Birthdays, Age or Life in general – it is just plain pretty. Lets face it – by 95 you’ve heard it all but you’ll still appreciate Prettiness. I hope!
This is my card…
P1020142 
and this is the sketch this week…
Mojo191Sketch
I used a cuttlebug embossing folder on only half of the base apricot colour card and surrounded the different elements with gold foil stickers to make them stand out. The gorgeous little stamp (which is out of it's packet and has no name) has been gold embossed on a spellbinder circle and layered on a spellbinder scallop to match. A few gold brads and a nice banner and voila! done!
Hope you like my take on the sketch this week. I was aiming for a vintage feel without the shabby bits Smile

Sunday, April 17, 2011

I love you Mojo Mum

Hi,


I have had a lovely Sunday watching my friend Trish's daughter acting in the local theatre company's plays today. She's gonna be a star that girl! Two plays in a row today - Cinderella & Aristocats. She made a scrumptious little mousey in the second one, very cute.

Anyway, when I got home I checked my diary and realised that Girl World would be sorely neglected until at least Easter! Too much work happening darn it! 
And so I spent the rest of the afternoon gettin my mojo on.....and here is the result.....


and here is the sketch for Mojo Monday #186....


 That's my Mum sorted for Mothers day, the next will be my Mother in Law no doubt :)

I have used the SU Fifth Avenue Floral rose and used a water-colour ink technique on an embossed image that I then cut out and layered up with some spellbinder circles & scallops. I used SU "Glorius Green" and "Ballet Blue" to colour with. The Manhattan Rose embossing folder was used on the white card at the top, and a Kaiser "I love you" stamped in black for the sentiment. MUM is stuck down in stickers. The floral paper was from a Paper Stack purchased at Big W. and there is some lovely green twine at the top with white ribbon tied in a bow to finish.

The water colour ink technique involved embossing the image on water colour paper. Spray the image with water until it pools inside the embossed areas. Take up a little ink on a brush and just touch the pool of water and watch the ink spread. Mix two colours together for a nice effect. Let it dry. Simple.

Tuesday, March 1, 2011

Time out for some Mojo

Hi Everyone,

I have had a wonderful day at home today with hubby away working in Brisbane and no interuptions meant that firstly my Mojo was a great deal of fun to do, and secondly, I got more than just my Mojo finished today! Will post more a little later when I've finished the set :)

I had three new stamps from Spesch Designer Stamps arrive last week and I've used one of them here, (and one on the last post) and hopefully, the final one on the next post too :)

Here is my submission today for the Mojo Monday #180...


The papers came from my stash and are a mish mash of Kaiser (the white one), DCWV Endless Summer ( the green one) and from a DCWV scrapbooking paper block (The pink polka dotted one).

The big flower brad was found on special at Kaiser yesterday - 50cents for a pack - I bought 6 packs! They have about 12 small square brads and 3 big round or square in each packet. That should go in for bargain of the week somewhere I think!

I love the little googly eyes on the rabbit, have been dying to use them, another bargain and I'm sure I have enough of them to do 200 bunny rabbits! 

The little girl - "Bonnie" - is coloured with a combination of copics, stampin write markers, blender pen and water pencils.

The gorgeous little paper roses were found at the ribbon lady at my local flea market.

This card is going in the post this week to my God-son's sister Lily, who fell off the monkey bars last week and broke her arm in two places! I hope it helps her feel a little better.

Wednesday, February 9, 2011

Love love Love Love Loooove

Hello,

Seeing as how Valentine's Day is getting closer and a couple of Valentines' challenges are running too, I thought I better pull my finger out and do something.

This card was made with left-over bits from my Vintage Card Class with J.A.M, I am going to use every last scrap of that sheet of paper it was so very pretty.


The L on this card is a chipboard letter that has been embossed with black glitter embossing powder, it really shines, I was very pleased with how it turned out. The rose stem has been threaded with Beads and the whole thing glued ontop of the L. The rest of the Love word and the sentiment is a simple rub-on.

I have also used some little clear beads and bits of lace here and there. The whole left side of the paper is trimmed with a little pom pom style lace which I had been dying to use and not found the right place for until now. Here's a close up for you....


I especially love how the paper is folded back revealing the underside which has a bold black herringbone pattern on it, and the rose is kinda tucked in there peeking out surrounded by clear beads and more lace here too, they all offset that gorgeous paper.


In the bottom corner I have added more lace and beads with the rose, along with these stemmy blobs that will be perfect for the inner stamens of flowers. I don't know what they are called, but I found a packet and have a couple of hundred of them now. They are just gorgeous.


Well I'll enter this over at Sandies Place for her February Challenge which is themed with Fabric & Love. I got the Love right, the fabric is a bit lacey though lol.

There is also  Challenge # 14 at Stamps R Us with Valentine/Love theme that I think this card fits perfectly. Even though I've not used a single stamp here!

Above all else, I hope you enjoy looking at it :)

Monday, February 7, 2011

My own Shoebox Swap

Well I must say thank you to Trish for sending me a picture of my card. She took my shoebox home to finish off her own copy of my card.

This is the card I put in the shoebox swap


My card is made with the same DP that I used on the Mojo 176 card. I did say I bought a lot of it!

In the box I placed textured white card stock for the card base (cut to size),  "Tempting Torqoise" ink pad and Jumbo Roller with the "Friendly Words" roller attached -from Stampin Up 3 x embossed roses to be coloured in by the participant. a strip of ribbon, the beautiful blue DP, 3 x rhinestones, a push pin with shiny blue top and a pretty blue bead.

The tools included were an X-Cut punch, Water brush, sponge,The Jumbo Roller, and some glue and dimensional tape.

The instructions went something like this:
Roll the Jumbo Roller Friendly Words stamp across the top of the card, making sure to have the words facing the right direction for a tent fold card.
Colour in the three embossed roses with the water brush or sponge and cut them out. Making sure to have 1 x full sized Rose, 1 rose with the outer petals cut off and the third rose with all the outer petals cut off. Hilight with more ink the outer edges of each rose.
Layer these roses biggest on the bottom to smallest on the top with dimensional tape between them.
Punch the border along the bottom of the DP and stick it beneath the rolled image on your card.
Tie the ribbon around the whole card, covering the gap and tie a bow.
Stick the dimensional rose to the front of the card, over the ribbon - this will hold the ribbon in place.
Push the pin through the knot of the bow on the ribbon and glue the bead to bottom of the pin so no pointy end is showing.
stick the 3 rhinestones in place on the bottom of the card.


For those of you who don't know how it works, the Shoebox Swap involves a bunch of girls making a card and then putting into a Shoebox both the materials and the tools to make that card along with instructions on how it is done.

Then everyone puts their box on a table in the middle of the room and the boxes are numbered.
We all then go ahead and make eight cards starting with the number after our own box. So for instance, my box is number 1, I then go and make box numbers 2,3,4,5,6,7,8 and 9.
This system works well, depending on how many boxes you have of course.

There you have it!

The beauty of this idea is that everyone does something a little different with your design. Check out how Trish did hers.

Monday, January 24, 2011

I Heart Roses

I really do - Heart Roses!!! The roses on my card today were so easy to make and all I needed was a little glue, scissors and a post it note! I think they look awesome!!!
I have glued each rose down to a scalloped heart that was cut out with spellbinders and my Big Shot, and then it was matted onto white cardstock and I love you stamped in the bottom corner. The stamp was purchased at Sam's Warehouse of all places! The white cardstock has been paper pierced around the edges and matted onto some orange paper and then onto the red card. I put one little yellow rose in the bottom of the arrangement just to offset the colour against the I love you stamped in red.


 Here's a sideways shot showing the depth of these roses, luckily they're being hand delivered and I don't have to squash them into an envelope. I'm sure my hubby is gonna love this.


This is the perfect Valentines card of course so I will enter it in a couple of challenges and see what everyone else thinks.

Over at the Scrapbook Boutique there is some Valentines inspiration in the form of cupcakes that are just the ticket! Check them out here.

Also at Lexi's Creations : Challenge #32 is a Valentines challenge, so here you are.

The Corrosive Challenge Blog had something a little different which is always nice, a challenge to Reuse, Reduce & Recycle, which I think I have by using the Post It Notes. Maybe, maybe not - did they have to be used ones?

Click on the links to visit these guys and check out what everyone else has done, or maybe enter the challenges yourself.